Your Ad Here
Showing posts with label controller. Show all posts

Sunday, December 9, 2012

The elusive "Orange" Controller (Updated with *NEW* information)

Rare Original XBOX 'Live' Translucent Orange Controller

I have been asked about this controller a couple of times now. Honestly I have no clue whats it is, where it came from, who made it or how one would obtain it etc..

There has been speculation that it was a prize for a contest but I can find absolutely no documentation as to which contest, when and where.

You can clearly see one in this persons (unknown) collection . (middle shelf, on the right).
Rare Original XBOX 'Live' Translucent Orange Controller
(Middle shelf, on the right, in between the hard drive and the prototype crystal controller.)

 Someone that lives in Redmond, Wshington was able to find all three of these in a local thrift store. Here we have a Duke prototype called the "Dakota", a Debug Kit and the ever so elusive orange controller.
Rare Original XBOX 'Live' Translucent Orange Controller

Some people claim that the orange controller was a match to this console. But to me, it looks like either a one-of-a-kind color swatch mock up actually made by Microsoft using a Crystal jewel, or a custom tinted crystal console made by a fan. The hue of orange doesn't seem to match in my eyes...
Update : Actually it was a custom production made from Xbox short run marketing test parts. So this was a one of a kind Xbox.

Other people were trying to say that the orange controller was the segway for the "Super Rare Red Controller"... which turned out to be a batch of custom made, 3rd party controller shells as debunked by members of the xbox-scene forums several years ago.
Rare Original XBOX 'Live' Translucent Orange Controller

Prototype Duke Controller (no jewel)


Original Xbox Mexican Prototype DUKE controller

Original Description: (Italian)
Prototipo Joypad Xbox

Prototipo del primo modello di controller per microsoft xbox soprannominato Duke.
Tra le varie differenze, un ingresso supplementare nella parte inferiore.


Translated Description: (English)
Prototype Xbox Joypad

Prototype of the first model controller for microsoft xbox nicknamed Duke.
Among the various differences, an additional inlet at the bottom.


Since this is the only photo of this particular prototype I can not comment on the alleged "inlet" or "port" on the bottom of the controller. If this is in fact an actual prototype and not a classic Italian knock-off, it's a semi-early to mid design prototype. The buttons are not colored and there is a sever lack of a jewel.

An early, and I mean EARLY prototype controller can be seen HERE sitting in front of the Alpha II.

Later prototype "Duke" controllers can be found HERE.

If you have any other information on the alleged "Italian Duke" Prototype Controller, please use the "Contact" page above and drop me a line.

Thursday, December 6, 2012

Tutorial: Replace your xbox controller cable with a USB cable

Replace Original XBOX Controller Cable With A USB Cable

Description:
What if you want to use a controller on your PC or laptop to play games or emulators, BUT you dont want to shell out a bazillion dollars for a PC gaming controller?

What if you modded your xbox and no longer have those big ugly, original, controller ports. Youre a minimalist and only have USB ports?

What if you just want to do a simple, cheap, fast mod just for the sake of doing it?

If any of the above scenarios apply, then this is the mod for you! Please read...

The Build:
Basically all you need to do this is a controller and a USB cable with an a-type male plug on one end. And of course a soldering iron, solder, wire cutters or "side cutters", heat shrink (optional), hot glue (optional)...
Replace Original XBOX Controller Cable With A USB Cable


First thing you're going to want to do is remove the screws that hold your controller together.
Replace Original XBOX Controller Cable With A USB Cable

Set your screws aside. I use shot classes. I don't know if you have seen them in the background of my other tutorials' photos, but they're extremely useful for not loosing small screws or small pieces.
Replace Original XBOX Controller Cable With A USB Cable

Now, locate where the cord connects to the controllers' PCB (printed circuit board). If you're doing this to an S-Type controller, the connector block is actually soldered to the PCB, so you'll have to clip the wires about and inch and a half away from the block. In this case my wires were soldered to the motherboard and were extremely easy to remove. Once your cable is free, set both the PCB and cable aside.
Replace Original XBOX Controller Cable With A USB Cable

You'll notice that I'm actually using a different cable that is pictured above. I realized that I have been looking for my mini USB cable for a couple of days now... ANYWAYS... Time to clip the female end off of the cable. Most people leave a small portion of the wires so they can use it later, but I have other plans for the female end.
Replace Original XBOX Controller Cable With A USB Cable

Replace Original XBOX Controller Cable With A USB Cable

Replace Original XBOX Controller Cable With A USB Cable

I trimmed about an inch, maybe an inc and a half from the end of the insulation. Now, this particular cable does not use the standard red, white, green and black. Instead it uses GREY, white, green and black. After testing the grey wire in fact was the VCC (red) wire and the rest were spot on.
Replace Original XBOX Controller Cable With A USB Cable

I added a little heat shrink, then stripped and tinned the ends of the individual wires.
Replace Original XBOX Controller Cable With A USB Cable

Remembering the order in which I de-soldered the wires, I re-soldered the new ones in place. It was a little tight, but not too difficult. Remember that the GRAY wire replaces the RED (VCC) wire. Also, please note, that I skipped a solder pad in between the green (D+) and the black (GND) wires. This blank pad is reserved for the original controller cables' "Yellow" wire. 
Replace Original XBOX Controller Cable With A USB Cable

You're going to want to somehow secure the cable to the controller case. Once that's done, you may now put your controller back together.

NOTE:
A friend came over while I was doing this project and distracted me a little. I forgot to photograph the fact that I used hot glue in place of my cable stop.  I'm sure you can see it in the following photos.
Replace Original XBOX Controller Cable With A USB Cable


Replace Original XBOX Controller Cable With A USB Cable


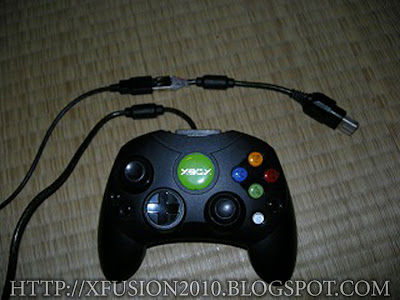
This picture shows the newly "USB-ified" original xbox controller plugged into my netbook. In the bottom right corner of the screen, you'll see that it was recognized, but unknown. I guess it's time to install the XBCD software and get this thing kicking properly!
Replace Original XBOX Controller Cable With A USB Cable

Here is the final product.
Replace Original XBOX Controller Cable With A USB Cable


Disclaimer:
Be careful using a soldering iron. They're HOT. Your wattage should be between 15 and 25. It is good practice to use "Lead Free" solder (for health reasons). Never leave your soldering unattended, especially around small children or pets. 
Please be careful to NOT short out ANY pins on the controller port or USB cable. Shorting pins WILL cause your hardware to FAIL (sometimes permanently). Check and recheck your work before attempting to use it.

Adapter: USB To Controller Port

USB To Original XBOX Controller Port Adapter

Description:
Build and use this adapter with XBCD on your PC or laptop for use with some games and almost all emulators..

The Build:
You don't need a whole lot to make this adapter. You would need a soldering iron, solder, spare controller port(s), USB cable with a male plug on one end, heat shrink (optional), LED (optional), resistor (optional).

In this particular build I added a blue LED to the mix to sort of spice it up a little. You dont have to, but I did... Including or excluding the LED does not effect the way this adapter works. 
USB To Original XBOX Controller Port Adapter

First off you want to remove the shielding from the port that you want to use and maybe trim the plastic down to make it as small as possible. You can use a file, sand paper, a saw, or a rotary tool (Dremel). I already had a stripped down controller port from a previous project, so I just used that in this write-up.

Start by prepping the pins by "tinning" them with a small touch of solder.
USB To Original XBOX Controller Port Adapter

Since I am going to be wrapping this up in heat shrink, to make her look pretty, I added the heat shrink PRIOR to soldering. I used 3 pieces of 1/2" (12.7mm). They were roughly 1 3/4" long each.
USB To Original XBOX Controller Port Adapter

Next I soldered the wires to the appropriate rails. Luckily this particular cable (taken from an old D-Link 4 port USB hub) used the standard colors. From left to right we have Red (VCC), White (D-), Green (D+) and Black (GND).

NOTE:
Notice that I skipped a pin in between the Green wire and the Black wire. Normally this is the XBOX's yellow wire speculated to be used for force feedback. It is not used in this adapter at all.
USB To Original XBOX Controller Port Adapter

This next step is completely OPTIONAL. I have included this in the tutorial just in case you wanted to try it yourself :) I aligned the LED to the center of the back of the port. Then I shaped the short leg of the LED (cathode or negative) and soldered it to the "Black" (GND) rail. Next I soldered a resistor to the "Red" (VCC) rail. You can see that I crossed the opposite resistor pin with the long leg of the LED (anode or positive)
USB To Original XBOX Controller Port Adapter

I soldered the joint and clipped it with fingernail clippers (that I specifically use for modding)
USB To Original XBOX Controller Port Adapter

I moved the first piece of heat shrink over the soldered area. 
USB To Original XBOX Controller Port Adapter

I used a lighter while rotating the adapter until the tube shrunk very snug around the soldered area.
USB To Original XBOX Controller Port Adapter

I repeated this step until all three layers were nice and tight. After it cooled I CAREFULLY used an x-acto knife to trim the "lip" from around the end.
USB To Original XBOX Controller Port Adapter

This is the finished product... YAY!
USB To Original XBOX Controller Port Adapter

Time to plug it in and test to see if it actually works.... The first pic is it plugged into my PC. Second pic is it plugged into my netbook. Both worked flawlessly. 
USB To Original XBOX Controller Port Adapter

Disclaimer: 
Be careful using a soldering iron. They're HOT. Your wattage should be between 15 and 25. It is good practice to use "Lead Free" solder (for health reasons). Never leave your soldering unattended, especially around small children or pets. 

Be careful using an x-acto knife. They're SHARP. Always cut away from yourself. Never leave an x-acto knife unattended, especially around small children or pets. If it has a cap, USE IT when you are not using the knife (as goes with any sharp blade or knife).

Please be careful to NOT short out ANY pins on the controller port or USB cable. Shorting pins WILL cause your hardware to FAIL (sometimes permanently). Check and recheck your work before attempting to use it.

XBCD: Xbox Controller Driver

Original XBOX Controller Vriver for PC

What is XBCD?
XBCD, or XBox Controller Driver is a tool that allows you to use your xbox controller on a PC. It is perfect for almost every PC emulator. You can also use XBCD in conjunction with the Action Replay Software to make a homebrew Action Replay for hacked gamesave transfers. (I will cover that at a later date)


Description from site:
(http://www.redcl0ud.com/xbcd.html)

Version 1.07
-------------------
Exports ~32 controls to Windows:
   - Up to 24 digital buttons.
   - 7 axes(X, Y, Z, RX, RY, RZ, Slider) in Windows 2000/XP.
     6 axes(X, Y, Z, RX, RZ, Slider) in 98/ME.
   - POV hat switch with 8 directions
Controller buttons, axes, and the digital pad can be mapped to any of the controls exported to Windows.
Supports up to 8 different configurations. The active configuration can be selected by pressing both Analog Sticks simultaneously.
Controller can be reported to Windows as a gamepad or a joystick.
Threshold settings for Buttons, Triggers, and Axes.
Deadzone settings for Analog Sticks.
Scaling of axes for sensitivity.
Gamepad settings can be saved to a file for later use.
Rumble support. Adjustable maximum force for each actuator.

How to use:
First off you need to be able to adapt your controller to USB in one way or another.
-USB to Controller Port
-USB Break-away
-Replace Controller Cable With USB Cable
-Use Break-Away with xbox AND PC


How to install (Windows XP):  
1) Download XBCD Driver

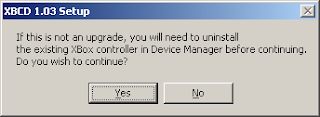
2) Run the file you downloaded in Step 1.  The XBCD installation will inform you that if  the installation is not an upgrade, you will need to uninstall the controller in Device Manager.  Click "Yes" to continue the installation.

3) Click "Next" through the rest of the screens in the XBCD installation.  At the end, you will need to unplug the gamepad and plug it back in.

4) Windows should find the device and should prompt you to install the "XBCD XBox Gamepad".  Select "Install the software automatically" and click "Next."

5)  Since the driver is not digitally signed, Windows might ask you if you want to continue with the installation.  Click "Continue Anyway."

6) Once the installation is done, click "Finish."  Windows will also prompt you to install an "HID-compliant game controller." Select "Install the software automatically" and click "Next."

7) Once the installation is done, click "Finish."

8) When the software is finished installing you can go into Control Panel and click the  Game Controllers icon. Select the xbox controller and now you can debug and troubleshoot if necessary.


NOTE:
I have only used this driver with an official Microsoft controller. I do not know if the driver supports other third party controllers. If you try this with a third party controller and it doesn't work, please dont get mad at me. Simply try an official controller.

Also, I do not know if this driver works for a "Duke" or "Potato" controller. I have only ever used an Original "S-Type" controller.

I do not know if this driver is supported on other operating systems. I have only ever used it with Windows XP Home Sp2 and Windows XP Professonial Sp3.


Disclaimer:
I did not come up with XBCD. ALL credit to redcl0ud for this awesome tool. This was actually the very first mod I did to ANY xbox components 8 years ago AND what got me into modding in the first place. I am just re-posting for archival purposes.


Thanks:
I would like to thank Redcl0ud for this driver. If it wasn't for him, I would never have gotten into modding in the first place. This site would never here if it wasn't for him. Thanks buddy!

Monday, December 3, 2012

Japanese S-Type Controller

Classic Style Japanese XBOX S-Type Controller 

DESCRIPTION:
We all know that when the original Xbox was released, it had huge controllers, sometimes referred to as "The Duke", or "The Potato". Microsoft released smaller controllers for the initial Japanese release of the xbox. Eventually these made their way to the US as the Xbox S Controller. What we have here is the Japanese controller that was issued prior to the release of the S controller in the US! So, it's very rare in the States and completely compatible with the NTSC Xbox console!

FEATURES & DIFFERENCES:
- These controllers are the exact same size as their American counterparts.
- As stated above, they are completely compatible with NTSC systems (it is unknown, at this time, whether they are compatible with PAL systems).
- The controller "Badge", or "Jewel",  is green and features the word "XBOX" rather than the american version which featured a black jewel with the "X" logo above the word "XBOX".
- The buttons appear to be "more clear" than their American counterparts. They are the same color but the white backing insert is significantly more shallow and further away from the actual letter (A, B, X Y).
- The cord, also, seems to be a lighter green hue, rather than their darker green or black American counterparts.

The back of the packaging.

Classic Style Japanese XBOX S-Type Controller
Close up of an "un-boxed" Japanese S-Type controller. 


Classic Style Japanese XBOX S-Type Controller
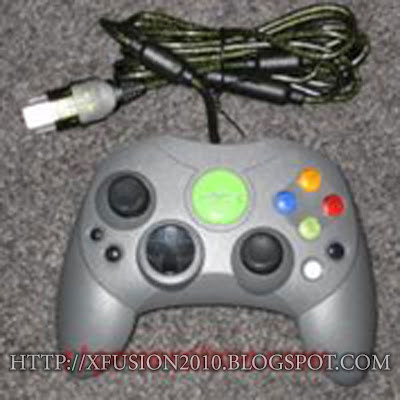
 A Japanese first issue S-Type controller in the real world. It looks to me like the owner of this controller has modified it to be used on a PC and still be compatible for use with a console.

This is a comparison with eh "Duke" and a Japanese S-Type controller.

VARIANTS:
It has been widely speculated there was a gray version of the Japanese S-Type controller. Not much information about this "speculated" controller exists today. However, I was able to dig up, once-and-for-all proof that they do, in fact, exist. There is no information as to how many were produced, or if they were issued with any particular console. I can only assume that they were sold separately as an accessory.

A loose gray version of the Japanese S-Type controller.

A packaged version of the "speculated" gray Japanese S-Type controller, proving that they do in face exist as an actual product of Microsoft, rather than a custom painted controller.


Tuesday, September 4, 2012

TUTORIAL: Repair A Frayed Controller Cable!

We have all, at some point or another, experienced this. Whether it's our own controller that just got worn, a recent eBay or craigslist purchase, or a friend or family members' controller. Time to put away that nasty old Duct tape. No more using electrical tape! Do it the right way...

Xbox Modification, Repair and Tutorials


Start with your controller with the frayed end.
Xbox Modification, Repair and Tutorials

Cut the cable right after that blocky thing (I don't know what else to call it). Get as close as you can using side cutters, or "dikes".
Xbox Modification, Repair and Tutorials

Xbox Modification, Repair and Tutorials

Locate and remove 7 screws. Normally the 7th screw is under a sticker. In this case, the sticker has already been removed.
Xbox Modification, Repair and Tutorials


In this example, you can leave the PCB (Printed Circuit Board) in the lower half of the shell.
Xbox Modification, Repair and Tutorials

Clip the cable on both sides of the boot.
Xbox Modification, Repair and Tutorials

Preparing the boot: You're going to want to remove everything from inside the boot. I used needle nose pliers to pull out the wires and shielding. I used a combination of an x-acto knife and a dremel to remove the original cable shrouding.
Xbox Modification, Repair and Tutorials

Xbox Modification, Repair and Tutorials

Remove the shroud and shielding from the wires attached to the PCB. Cut to size, strip and tin.
Xbox Modification, Repair and Tutorials

Cut your controller cable at a 45° angle and thread it though the boot.
Xbox Modification, Repair and Tutorials

Xbox Modification, Repair and Tutorials

I got a little ahead of myself... sorry.
Pull the boot back, strip and tin the wires. Solder the corresponding wires from the cable to the wires on the BCB. Use heat shrink to seal everything. If you notice in this picture, I used several pieces of heat shrink to make a "stop" that sits right in front of the boot to keep everything from pulling out.
Xbox Modification, Repair and Tutorials

Screw the shell back together and enjoy your newly restored controller!
Xbox Modification, Repair and Tutorials

You can apply this concept to ANY controller for the xbox... not just an s-Type. Doing this WILL shorten your cord by at least 3 inches, but hey, no more "sweet spots", no more sticky duct or electrical tape, no more fighting over the "good" controller.

Enjoy!